
US framing tutorial · Decks & porches
Deck and Porch Framing in SketchUp
Deck and porch framing in SketchUp connects the outdoor platform to the house, stairs and any roof above. Lizark’s US floor and supported porch workflows can help you study these relationships. Define the platform elevation and support concept before focusing on decking materials and finishes.
Follow along with numbered screenshots
Work in a separate practice model. These examples use Lizark 1.0.28 in SketchUp 2026. Read each action, enter the stated values, and check the result before continuing. Open any screenshot for a full-size view.
-
Step 1 · Choose the US wood profile
Open Lizark Settings → US Framing. Set Country to United States, choose Wood light-frame and check Enable US framing. For this exercise, use the 2x6 lap siding exterior assembly and a 108 in wall height. Scroll down and click Apply US framing before opening an assembly tool.
Screenshot 1 / 4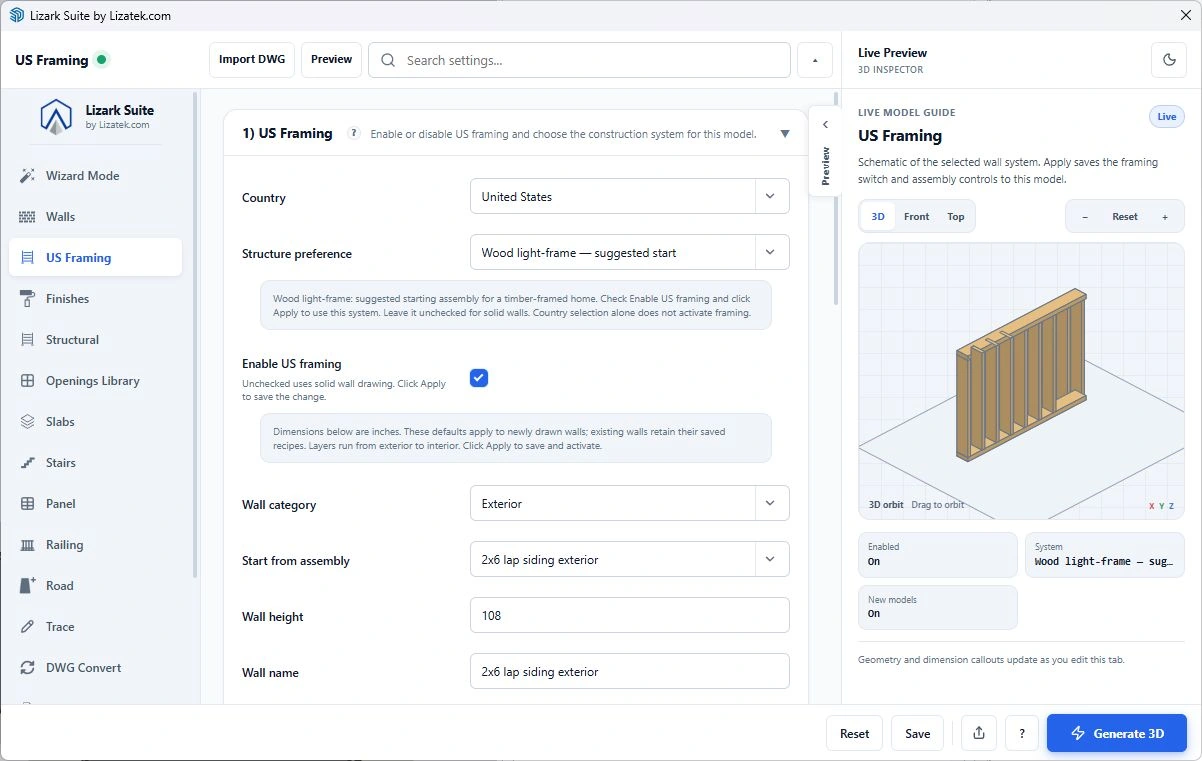
Fresh live Lizark configuration screen in SketchUp 2026. Open the image to read the controls at full size. View full size Checkpoint: The saved profile reports United States / Wood light-frame. A checked box or schematic alone does not mean the profile has been applied.
-
Step 2 · Choose Dimensions and Joists
Open US Floors / Decks. Select Dimensions under Drawing mode, then select Joists under Framing system. Dimensions mode creates the footprint from numeric inputs; Pick mode instead asks you to mark boundary points in the model.
Screenshot 2 / 4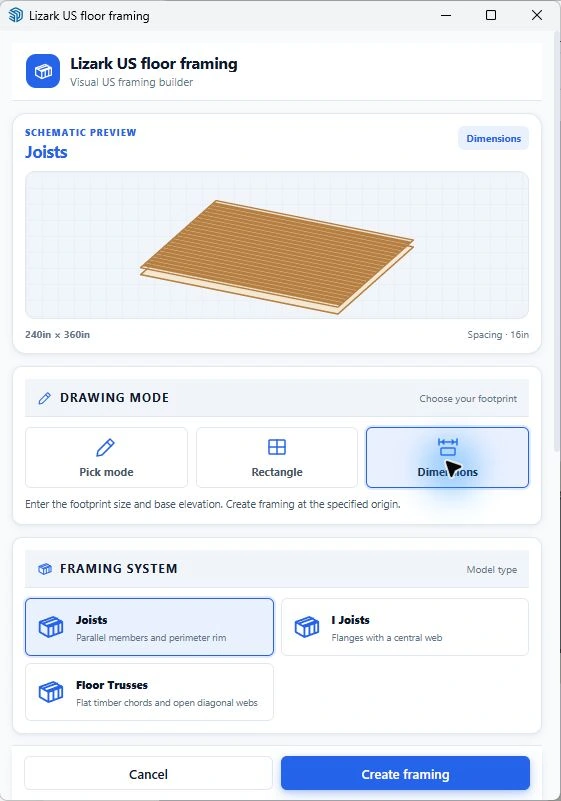
Fresh live Lizark configuration screen in SketchUp 2026. Open the image to read the controls at full size. View full size Checkpoint: Dimensions and Joists are highlighted, and the bottom button reads Create framing.
-
Step 3 · Change the floor inputs for a raised platform
Use the same floor input fields shown here, but change the pictured 240 × 360 in footprint to 144 × 240 in and change Base elevation from 0 in to 36 in. Keep the member-depth, spacing and subfloor inputs below. Click Create framing. This produces a coordination platform with subfloor, not a finished exterior deck.
Example inputs for step 3 Span / length — change pictured values 144in / 240in Origin X / Y 0in / 0in Base elevation — change pictured value 36in Depth / spacing / subfloor 9.25in / 16in / 0.75in Screenshot 3 / 4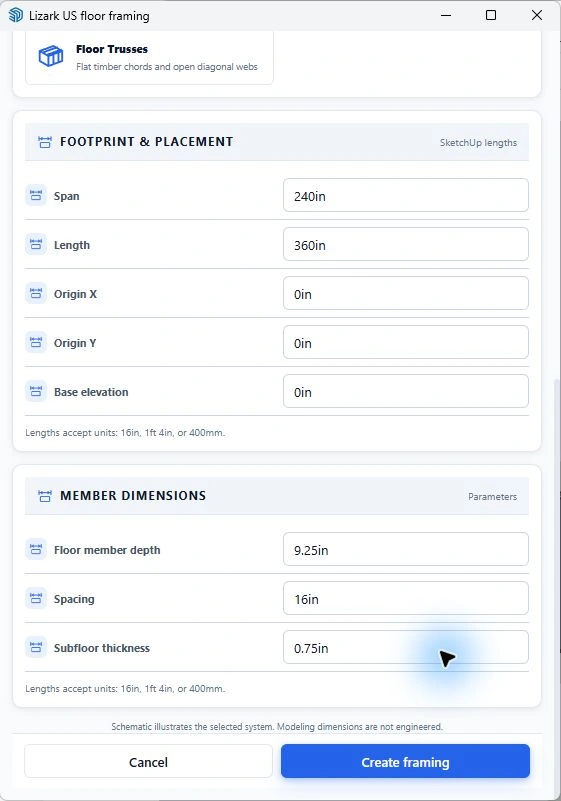
Fresh live Lizark configuration screen in SketchUp 2026. Open the image to read the controls at full size. View full size Checkpoint: The platform measures 12 × 20 ft at the chosen raised datum. Do not describe the subfloor as exterior decking.
-
Step 4 · Coordinate access and the exterior deck concept
Frame the platform and compare its footprint and elevation with the intended doorway, stairs and support concept. Add project-specific references for posts and beams separately. Resolve attached versus freestanding support and the exterior decking system before developing the construction model.
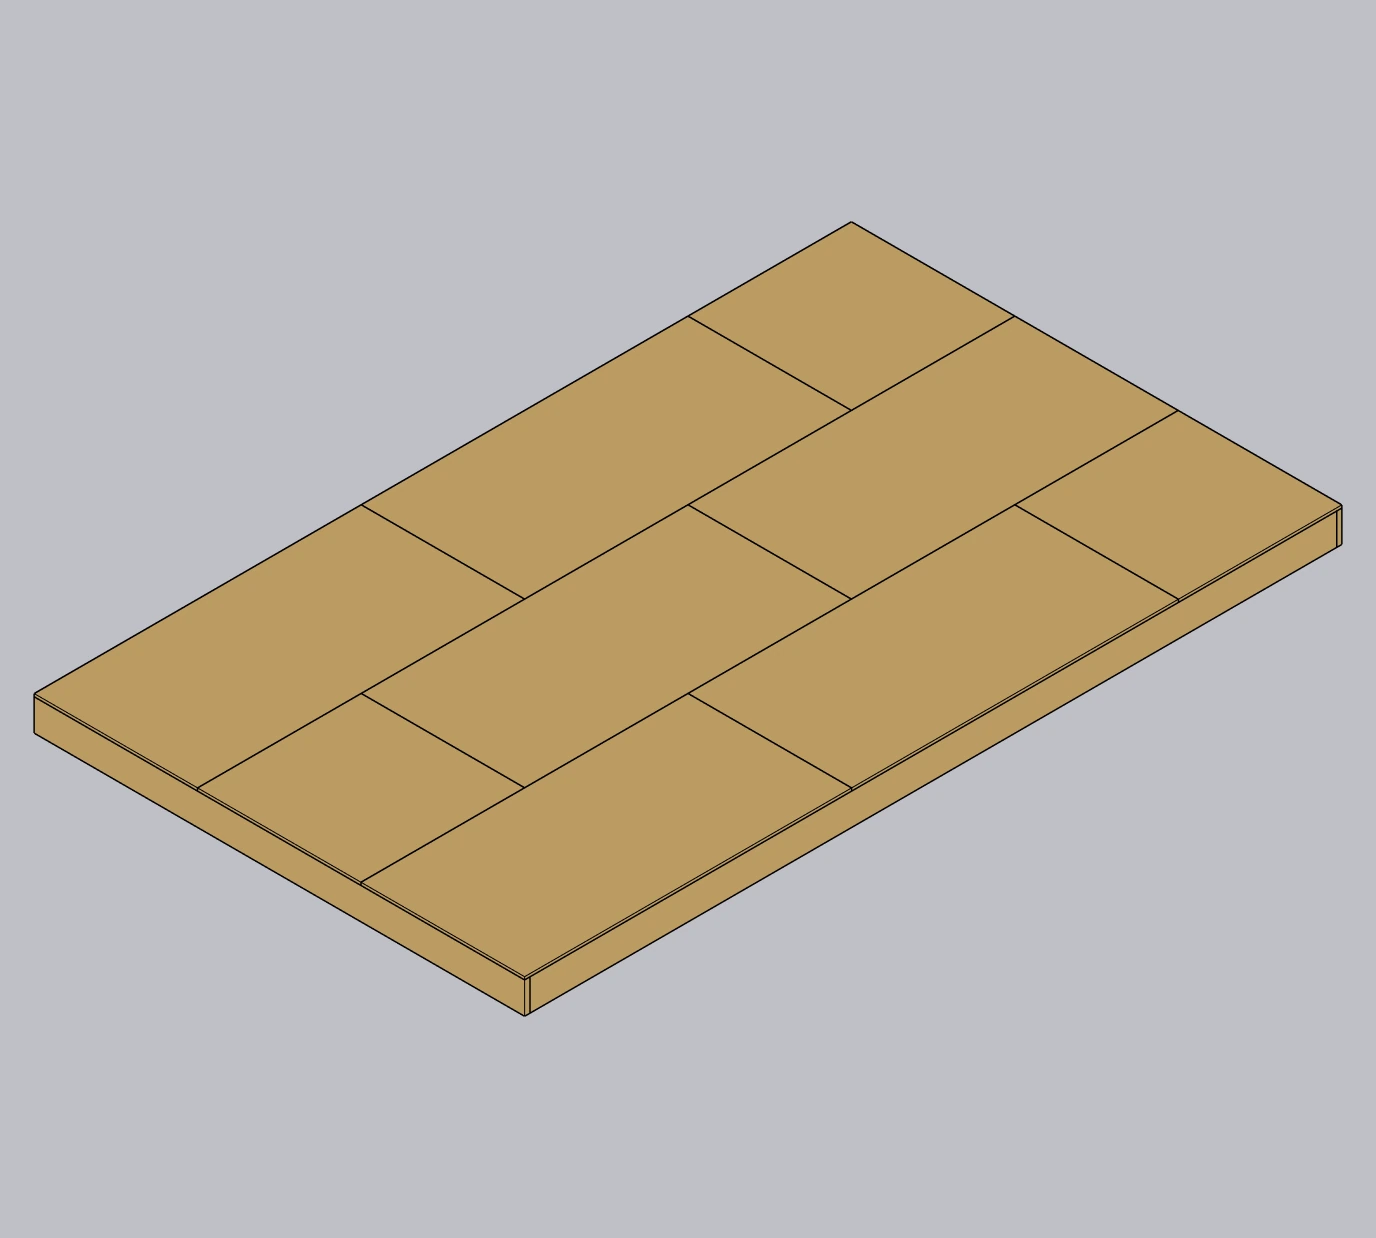
Screenshot 4 / 4Fresh live SketchUp result: a 12 × 20 ft platform used as a deck coordination proxy. It is not a completed exterior deck. View full size Checkpoint: The raised footprint and access concept agree. Ledger, post connections, exterior boards and guards remain separate design decisions.
Distinguish an open deck from a covered porch
An open deck study focuses on the platform, access and perimeter. A covered porch also needs roof geometry, posts and the relationship between roof supports and the foundation below. Name the option clearly when presenting it to a homeowner.
A ground-level platform and an elevated platform need different coordination. Establish the intended finished surface relative to the door threshold and yard. A model that looks level in perspective can still create an awkward step at the house.
Build the support story into the model
Review joist direction, beam locations, posts and piers together. Supported Lizark porch tools work from the appropriate generated host assemblies; inspect the resulting linked geometry after using them.
Use the American Wood Council’s deck resources as technical background for wood deck discussions. Their prescriptive guidance has defined scope and edition limits. Confirm the applicable local requirements and project conditions instead of treating a generic guide as approval for every deck.
Coordinate access and the exterior envelope
Study stairs and landings with the deck elevation, then add perimeter guard and handrail geometry for review. Keep clear walking space visible in the model. Furniture can help explain use, but should not hide the platform edges or access route.
At the house connection, reserve attention for flashing, drainage and the selected structural connection details. Roof posts also introduce loads that a simple floor study does not calculate. Keep these decisions separate from material colors in the client presentation.
Worked example: a 12-by-20-foot platform study
Use a 12 ft by 20 ft rectangle to study an outdoor platform next to an addition. Establish its elevation relative to the intended door threshold and the yard. Generate the supported floor assembly as a coordination proxy, then identify the actual exterior decking and support specification separately. A subfloor surface in a study model should not be mistaken for a complete weather-exposed deck assembly.
Mark the proposed joist direction and the location of beams, posts or foundation supports. Look at the platform from below as well as from above. A finished surface can conceal whether the support concept agrees with the footprint. Save a plan that shows the house edge, access route and perimeter before adding furniture or a roof.
For a covered porch option, introduce the roof and post locations using the same reference system. Compare the posts with the supporting structure below. A roof post landing on a convenient-looking surface does not establish a load path. Keep the roof support concept visible so the structural designer can resolve the actual members and connections.
Attached and freestanding options need different reviews
An attached deck introduces questions at the house connection: the existing wall or rim condition, flashing, drainage and the selected connection detail. A freestanding concept still needs its own support arrangement and separation from the house. Name the option clearly in the model; do not show a connection to the house when the intended structure is independent.
American Wood Council deck guidance is useful background, but its prescriptive scope and referenced code edition matter. Check those limits and the locally adopted requirements before using a detail. The model should locate the ledger, beam and post questions, not imply that one connection recipe is suitable for every existing building. Show any unverified existing condition in the review notes.
Finish the circulation review before the rendering
Check the door approach, stairs, landings and perimeter guard with the platform elevation settled. Furniture should demonstrate usable space without hiding exits or edge conditions. Save a view of the bare platform and another with the proposed use. Include threshold and yard relationships so the homeowner understands the vertical transitions as well as the plan size.
A practical Lizark workflow
- Identify open deck or covered porch scope.
- Set footprint, elevation and door-threshold relationship.
- Coordinate joists, beams, posts and foundations.
- Review stairs, landings and perimeter railings.
- Present the structure and finished outdoor space together.
What to check in the model
| Review | What to verify |
|---|---|
| Elevation | Threshold, platform and yard |
| Supports | Joists, beams, posts and piers aligned |
| Roof | Post and bearing relationships for covered porches |
| Access | Stairs, landings and clear circulation |
Frequently asked questions
Can I treat a deck floor study as a complete porch design?
No. A covered porch also needs roof, post, connection and foundation coordination.
Does a deck resource apply to every US jurisdiction?
Check the guide’s scope and edition, then confirm the requirements adopted locally for the project.
Further reading
Product and industry references for the distinctions discussed in this guide:
