
US framing tutorial · Roof rafters
Roof Rafter Framing in SketchUp with Lizark
Roof rafter framing in SketchUp makes pitch and roof shape easier to review with a client. Lizark’s US roof workflow includes supported gable, shed and hip rafter options. Start from the roof footprint and wall elevation, then inspect how the modeled rafters meet the architectural form.
Follow along with numbered screenshots
Work in a separate practice model. These examples use Lizark 1.0.28 in SketchUp 2026. Read each action, enter the stated values, and check the result before continuing. Open any screenshot for a full-size view.
-
Step 1 · Choose the US wood profile
Open Lizark Settings → US Framing. Set Country to United States, choose Wood light-frame and check Enable US framing. For this exercise, use the 2x6 lap siding exterior assembly and a 108 in wall height. Scroll down and click Apply US framing before opening an assembly tool.
Screenshot 1 / 5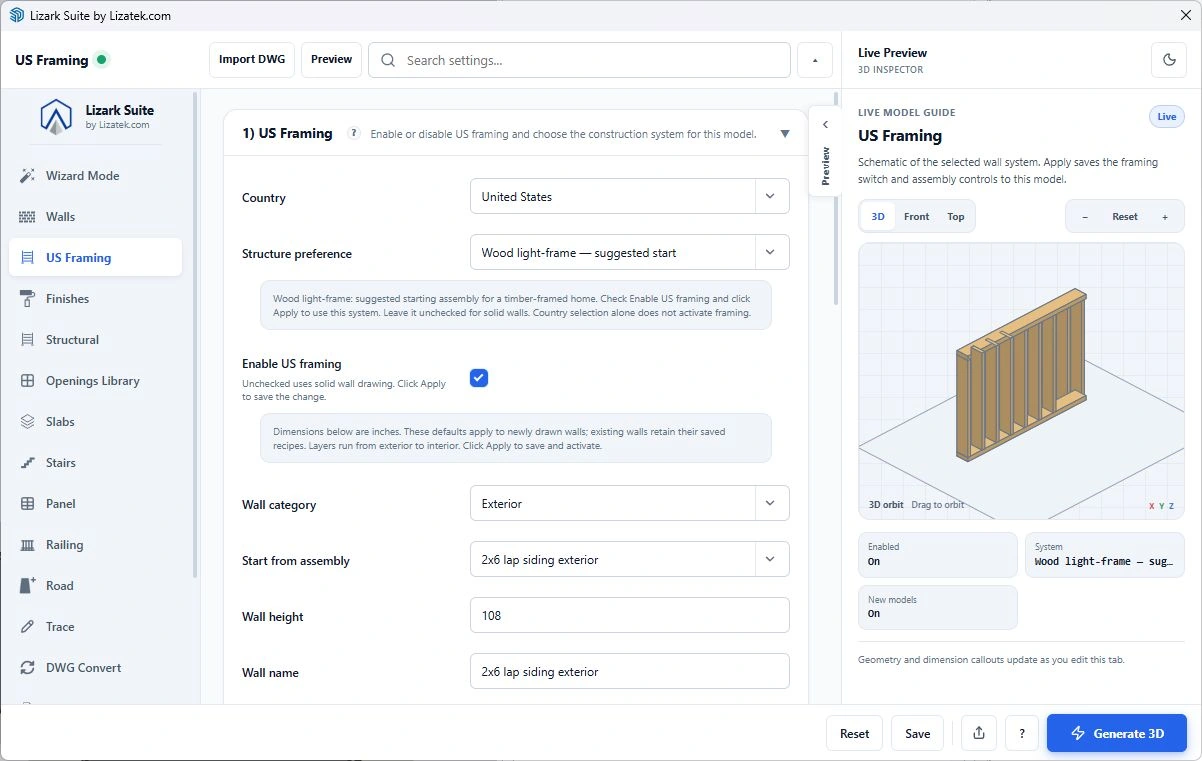
Fresh live Lizark configuration screen in SketchUp 2026. Open the image to read the controls at full size. View full size Checkpoint: The saved profile reports United States / Wood light-frame. A checked box or schematic alone does not mean the profile has been applied.
-
Step 2 · Open the US roof dimensions workflow
Open US Roof Framing. In Roof Builder, choose US roof system by dimensions. This opens the US framing builder where you can choose rafters or trusses. Use the US framing controls for this exercise rather than the separate Build Roof button.
Screenshot 2 / 5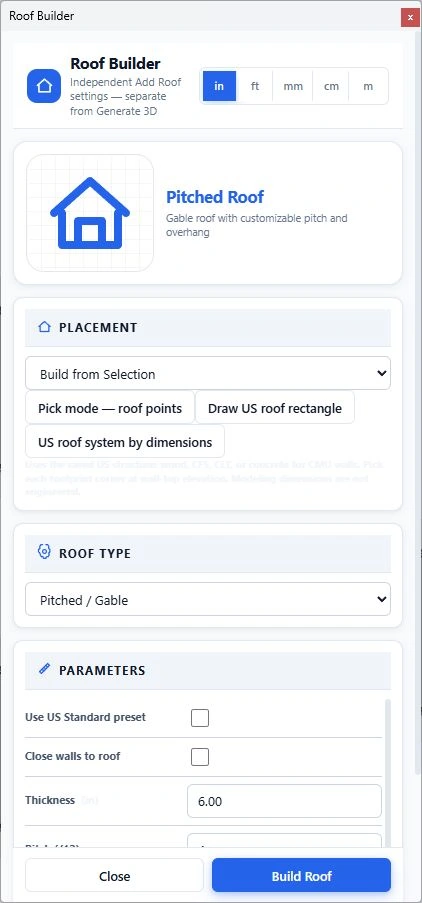
Fresh live Lizark configuration screen in SketchUp 2026. Open the image to read the controls at full size. View full size Checkpoint: The next dialog is titled Lizark US roof framing and offers Fink, Howe and rafter systems.
-
Step 3 · Choose Rafters in Dimensions mode
Keep Dimensions selected and choose Rafters under Framing system. Check that the schematic changes from a webbed truss layout to sloping rafters and a ridge. Shed Rafters and Hip Rafters are separate choices; this exercise uses the symmetric gable option.
Screenshot 3 / 5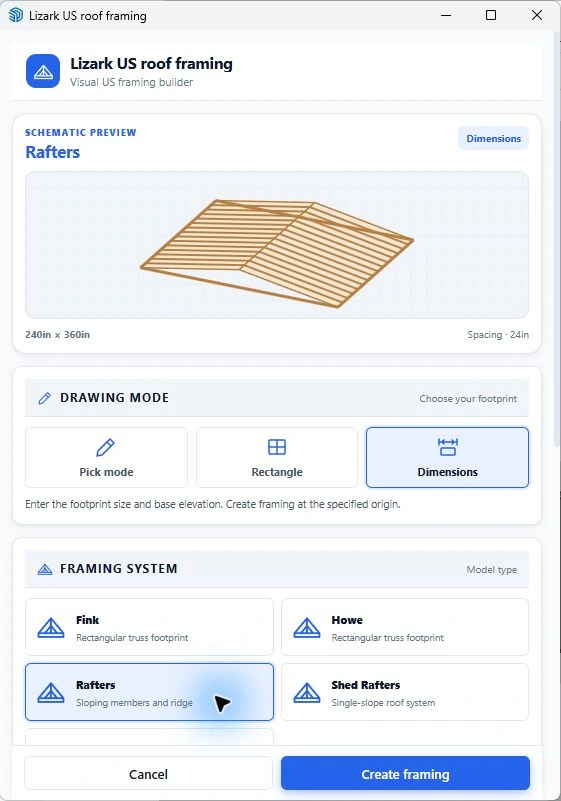
Fresh live Lizark configuration screen in SketchUp 2026. Open the image to read the controls at full size. View full size Checkpoint: Rafters is highlighted. A Fink or Howe selection produces a different system.
-
Step 4 · Enter the footprint, elevation and pitch
Scroll to Footprint & Placement. Use a 240 in span and 360 in length. For a new standalone exercise, use Origin X and Y of 0 in; change Base elevation from the pictured 0 in to 108 in to match the wall-top study. Set Pitch (rise per 12) to 6 and Spacing to 24 in, then click Create framing.
Example inputs for step 4 Span / length 240in / 360in Origin X / Y 0in / 0in Base elevation 108in — change the pictured 0in Pitch / spacing 6 / 24in Screenshot 4 / 5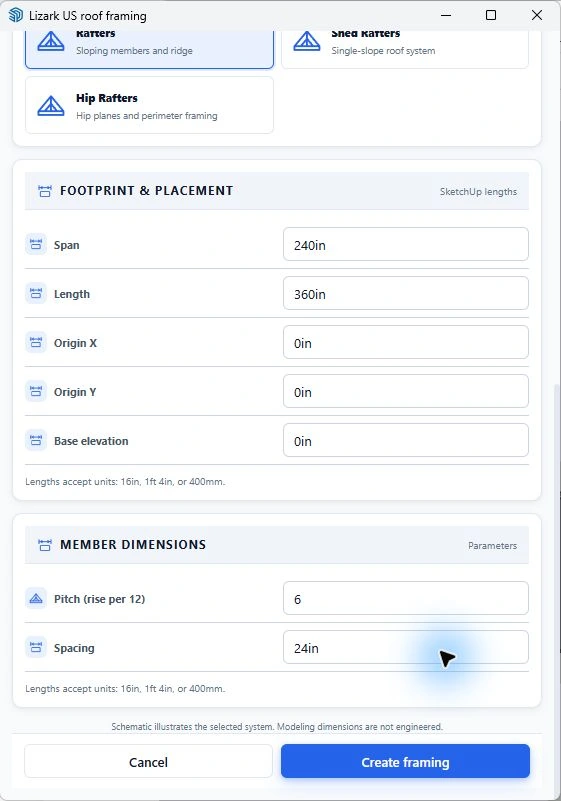
Fresh live Lizark configuration screen in SketchUp 2026. Open the image to read the controls at full size. View full size Checkpoint: The roof footprint is 20 × 30 ft. Pitch 6 means 6:12; it is not a six-degree slope.
-
Step 5 · Compare the generated rafters with the footprint
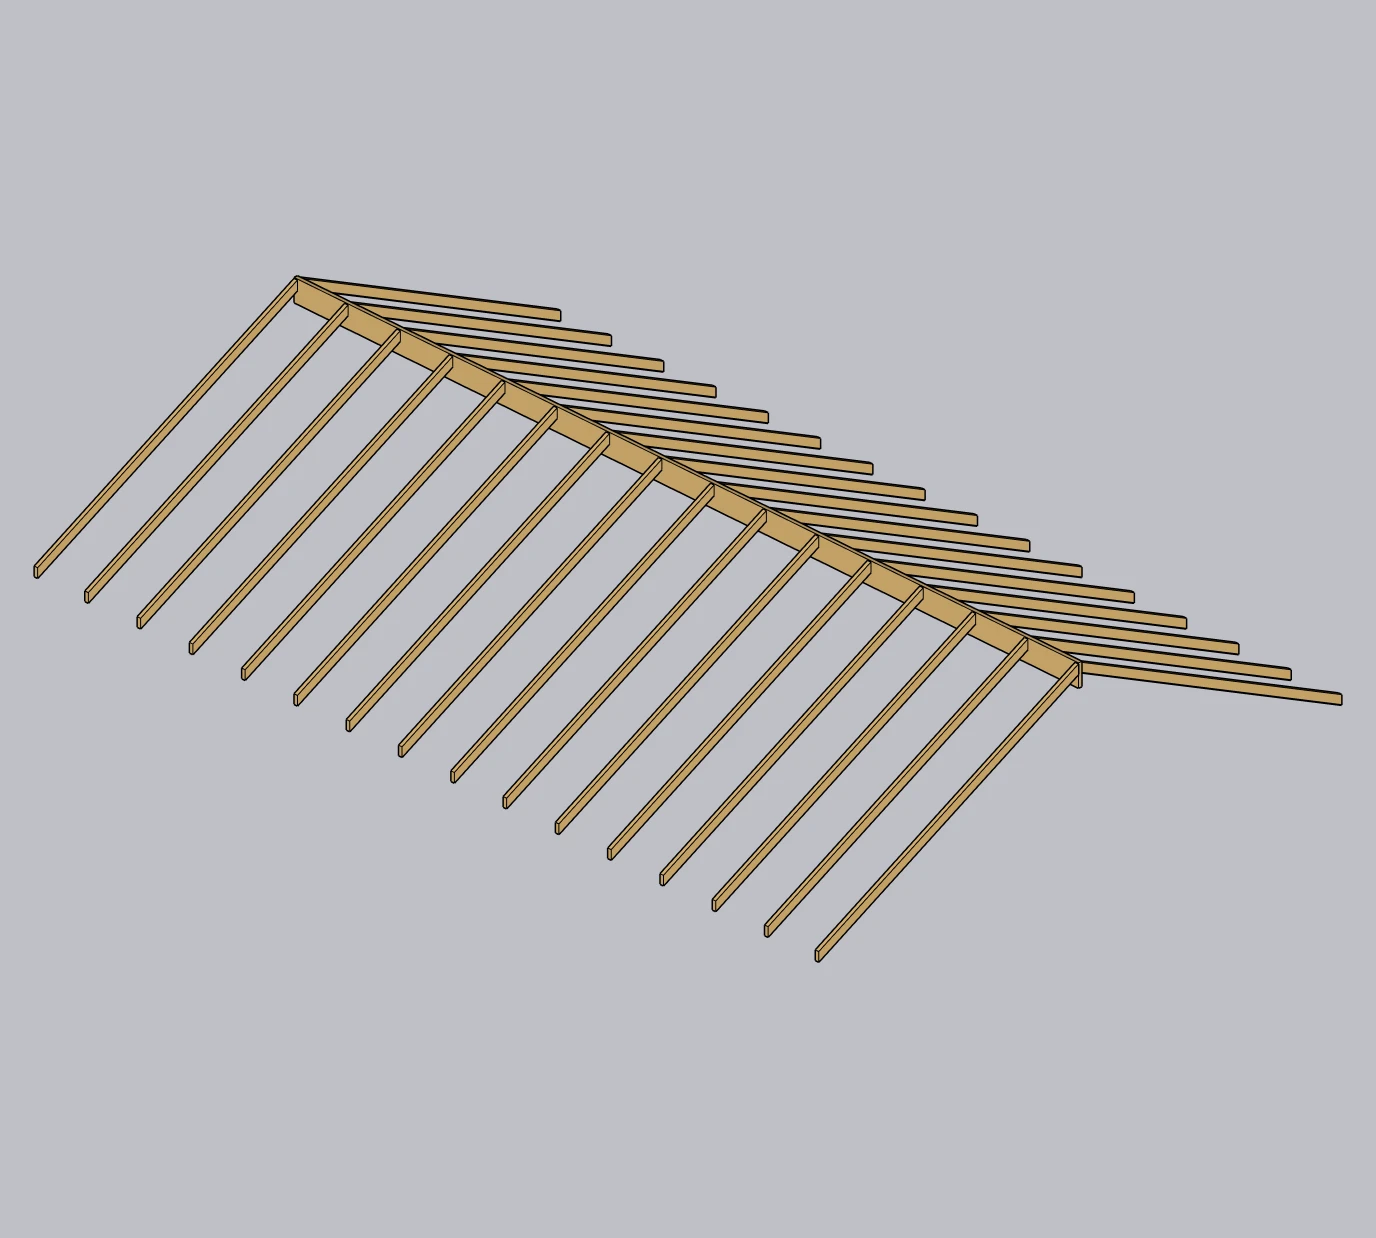
Frame the assembly in an isometric view and inspect its end elevation. Measure the base and ridge relationships from the same datum as the walls. Compare member repetition along the length before adding a covering or presentation material.
Screenshot 5 / 5Fresh live SketchUp result: the 20 × 30 ft, 6:12 gable-rafter study with its covering omitted. View full size Checkpoint: The roof has two rafter slopes meeting at the ridge. Check alignment and elevation against the walls.
Use rise over run to describe the pitch
US roof pitches commonly use a rise-to-run expression. A 6:12 study rises six units for twelve units of horizontal run; it is not a six-degree slope. Record the expression alongside the model so the design team reads the input consistently.
Pitch affects ridge height, interior volume and the relationship to adjacent roofs. Compare alternatives using the same footprint and base elevation. A steeper option can look attractive while creating an unwanted height change at an addition.
Build a roof framing study
Apply the appropriate construction profile and open US Roof Framing. Choose the supported rafter model, then set the footprint, origin, base elevation, pitch and spacing. Measure the generated geometry against the wall layout before adding presentation materials.
For a shed roof, identify the high and low edges. For a hip roof, examine the diagonal framing and the corners rather than relying on the overall silhouette. Roof shape alone does not settle the bearing, tie or connection details.
Keep the structural and architectural views aligned
Capture a framing view without the roof covering when discussing member layout. Use a finished roof view when reviewing massing and exterior proportions. Label the study so viewers understand which layers are being shown.
Coordinate eaves, wall tops and any roof openings with the project design. A rafter model is useful for communication, but it does not calculate snow, wind, uplift, member sizing or connection forces. Treat demonstration spacing as a visual input until the project design establishes the actual specification.
Worked example: understand a 6:12 gable study
A 6:12 pitch describes 6 units of rise for 12 units of horizontal run. For a symmetric gable across a 20 ft span, the simple half-span is 10 ft and the corresponding centerline rise is 5 ft. That calculation is useful for checking the intended roof shape. The actual outer bounds also depend on ridge geometry, member depth, joint arrangement and the reference used at the eaves.
Create a 20 ft by 30 ft roof study at a recorded wall-top elevation. Enter the pitch and spacing, generate the supported rafter layout and inspect it in a straight end view. Measure the ridge relationship from the same datum used for the walls. A perspective makes the roof easy to recognize, but the end view makes a wrong pitch or elevation easier to diagnose.
Compare the roof footprint with the structural wall references before adding covering. Identify whether the footprint describes the bearing perimeter or an exterior overhang boundary. That distinction affects how the assembly aligns with the building. Keep the assumed overhang and roof edge in the review notes rather than hiding the choice inside a camera angle.
Review eaves, hips and intersections separately
A rectangular gable is a useful first study because it has a simple ridge and two main slopes. A shed roof changes the high-side and low-side wall relationships. A hip roof adds diagonal intersections and perimeter conditions. Treat a change in roof type as a new coordination review, even when the overall plan dimensions remain the same.
Check porch connections, roof-to-wall steps and additions in section. Look for a new roof intersecting an existing window, wall or roof edge. A finish surface can conceal misplaced members, so save the exposed framing view before showing the completed envelope. Structural sizing, uplift connections and weatherproofing need their own project details; the geometric intersection is the first question to resolve.
Make the roof comparison readable for a client
Use consistent camera positions for alternatives and keep their wall-top reference fixed. Present the end profile, plan footprint and one perspective together. Label roof type, pitch and demonstration spacing, then identify the assumptions that differ. This helps a homeowner understand why a lower pitch or different roof type changes height and exterior proportions without turning a visual preference into an engineered roof specification.
A practical Lizark workflow
- Choose the US profile and supported rafter roof type.
- Enter the footprint and base elevation.
- Set the pitch with an explicit rise-to-run expression.
- Review spacing and the generated roof against the walls.
- Save structural and finished views for design review.
What to check in the model
| Review | What to verify |
|---|---|
| Pitch | Rise/run expression and measured ridge height |
| Base | Consistent wall-top reference |
| Roof form | Gable, shed or hip matches the intended option |
| Coordination | Eaves, roof openings and adjacent roof intersections |
Frequently asked questions
What does a 6:12 pitch mean?
It describes six units of rise for twelve units of horizontal run. Keep the units consistent.
Are roof rafters and roof trusses interchangeable model types?
No. Choose the system intended for the project. Rafters and manufactured trusses need different coordination and design information.
Further reading
Product and industry references for the distinctions discussed in this guide:
