
US framing tutorial · Stairs
Stair Framing in SketchUp with Lizark
Stair framing in SketchUp starts with the relationship between two floor levels. Lizark provides supported stair layouts and material-system settings for stair studies. Establish the finished-floor references, choose the layout, and review the treads, risers and landings in the surrounding building model.
Follow along with numbered screenshots
Work in a separate practice model. These examples use Lizark 1.0.28 in SketchUp 2026. Read each action, enter the stated values, and check the result before continuing. Open any screenshot for a full-size view.
-
Step 1 · Select a dog-leg stair layout
Open Add Stair and choose Dog-Leg Stair in Stairs – Settings. Select in for units. Read the plan schematic: two parallel flights meet at a landing. This exercise demonstrates the concrete stair layout shown below; it does not create timber stringer detailing.
Screenshot 1 / 3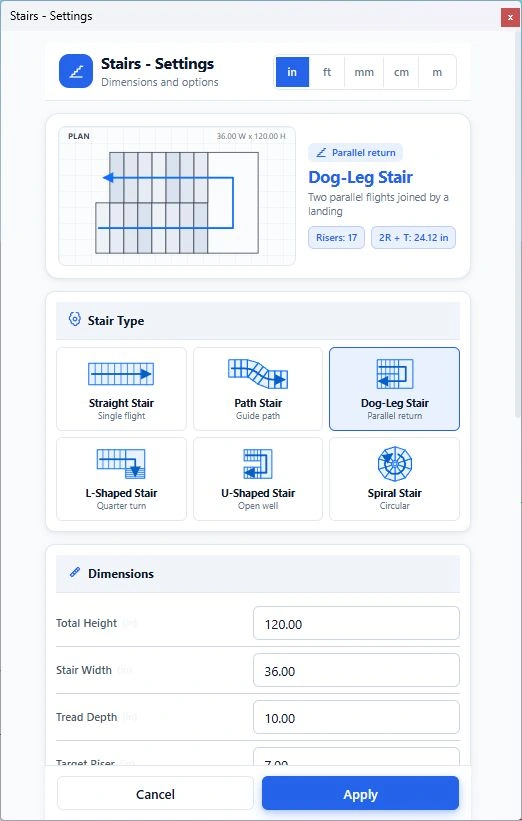
Fresh live Lizark configuration screen in SketchUp 2026. Open the image to read the controls at full size. View full size Checkpoint: Dog-Leg Stair is highlighted and the schematic shows the parallel return.
-
Step 2 · Set the rise, width, tread and landing
Scroll to Dimensions and use the captured values below. Set Auto Height From Roof to No for this numeric exercise. Click Apply, then place the stair base on the intended floor plane and orient its run. Read the tool’s placement prompt and inspect the preview before completing placement.
Example inputs for step 2 Total height / stair width 120 / 36 in Tread depth / target riser 10 / 7 in Waist thickness / landing depth 6 / 36 in Landing steps / auto height 0 / No Screenshot 2 / 3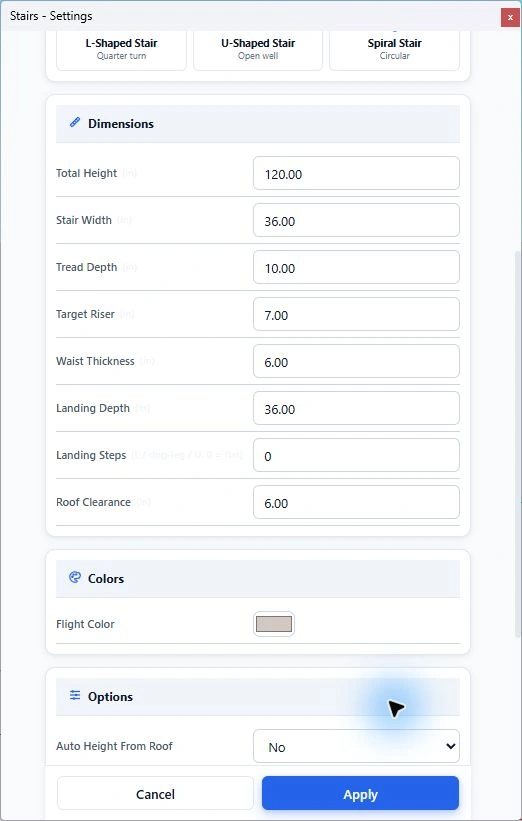
Fresh live Lizark configuration screen in SketchUp 2026. Open the image to read the controls at full size. View full size Checkpoint: The target riser is an input; check the resulting riser count and actual rise. These values are demonstration dimensions, not a construction specification.
-
Step 3 · Review the landing and floor connection
Return to Select and inspect both flights and the landing. Measure the top walking surface against the next floor datum. Use a section to review clearance and the underside; the 108 in arithmetic example elsewhere in the guide is a separate exercise from these captured 120 in settings.
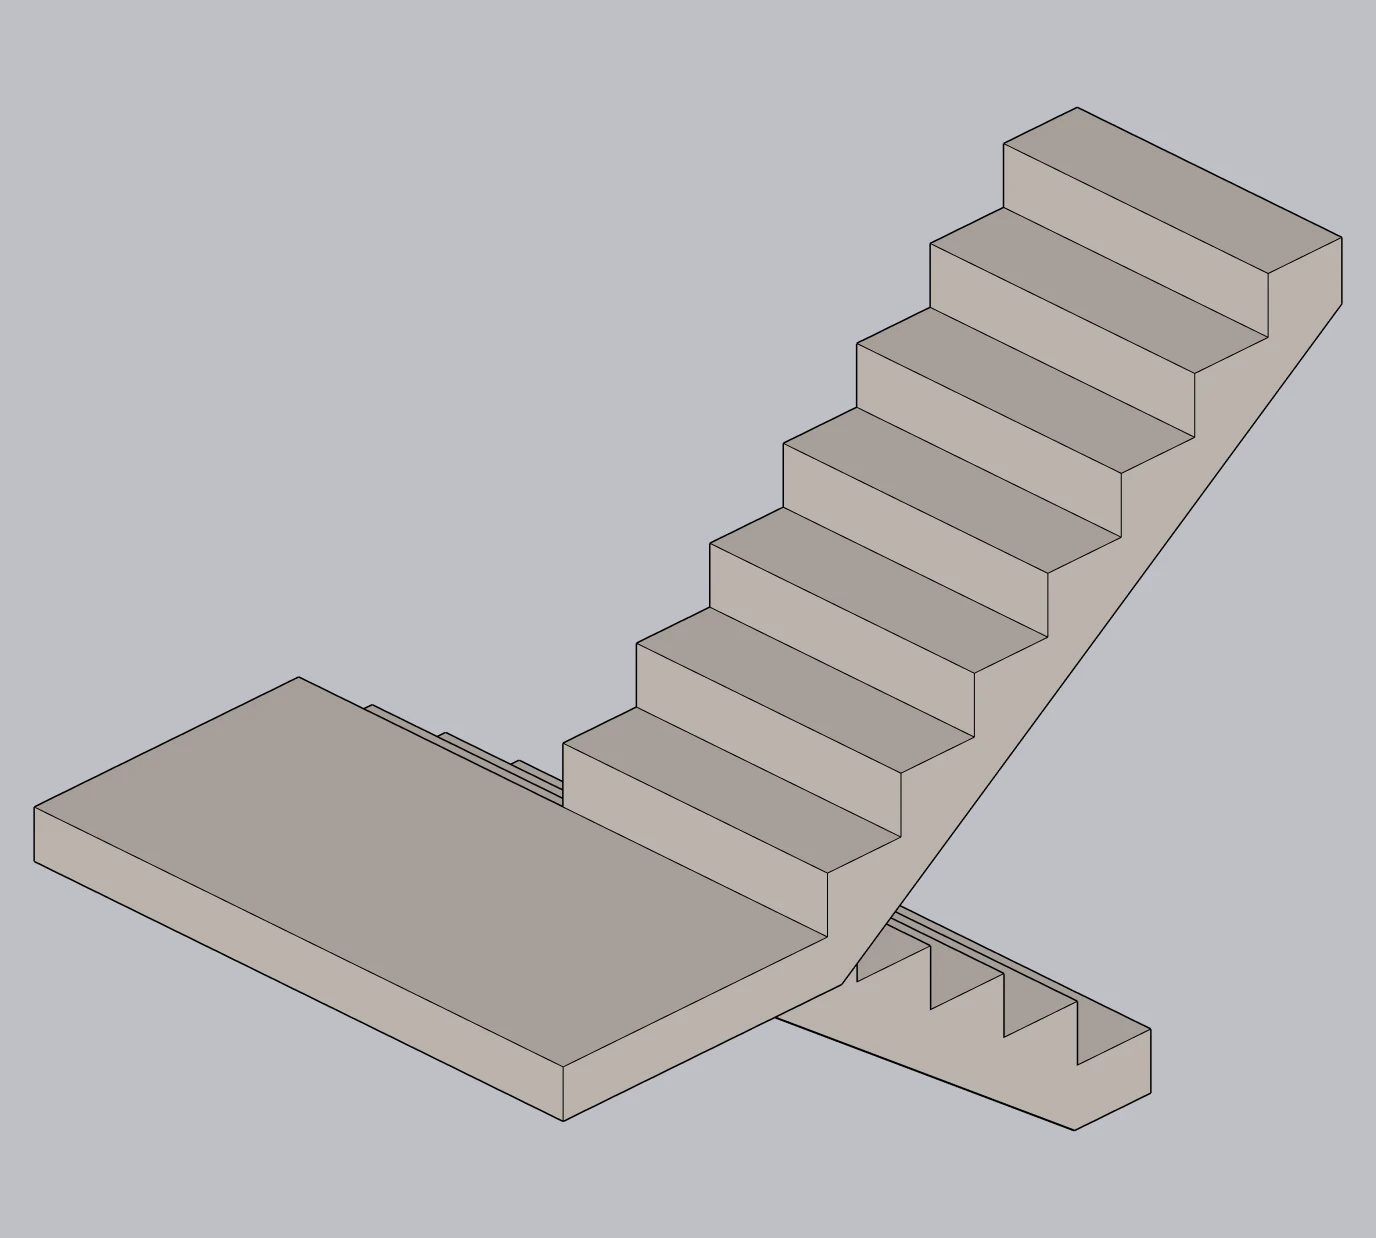
Screenshot 3 / 3Fresh live SketchUp result: a concrete dog-leg stair layout. Use it to compare flights and landings, not timber-framing details. View full size Checkpoint: Both flights and the landing are present, and the top connects to the intended floor elevation.
Measure the floor-to-floor relationship
Use the intended lower and upper floor references when setting the rise. Structural floor elevations and finished floor elevations can differ. Include the finish buildup in the coordination notes so the stair arrives at the correct landing surface.
Choose the stair width and layout from the design brief. A straight stair needs a long run; an L-shaped or dog-leg arrangement changes the footprint and introduces a turning or landing condition. Compare the full footprint before choosing the option.
Select a supported layout and material system
Review the stair settings before placement. Lizark supports material-system choices including timber, steel and concrete, with supported layouts depending on the selected workflow. Confirm the actual generated system instead of labeling every stair as wood framing.
Review the relationship between tread depth, riser target and total rise. The generated count must be checked in the model. A target value is not a substitute for verifying the actual risers and the top and bottom transitions.
Check the space around the stair
Use a section to review headroom, the floor opening and the upper landing. Check circulation and adjacent doors in plan. The stair should be coordinated with the joist layout and surrounding walls, not treated as an independent object.
Add railing and handrail studies only after the stair geometry is established. Review clearances and applicable local requirements with the project designer. A visual stair preset does not certify the dimensions, support or guard design for construction.
Worked example: verify total rise and actual risers
For a simple arithmetic check, take a floor-to-floor rise of 108 in and divide it into 15 equal risers. The result is 7.2 in per riser. This calculation shows how a count relates to total rise; it is not a recommendation for a project or a code check. The selected workflow may choose a different count, and the actual generated elevations must be measured.
Place the supported stair beside clearly identified lower and upper floor references. Inspect the first step, the turning or landing condition and the final transition. Count the generated risers in elevation and compare the measured top with the intended finished floor. Include finish buildup at both ends so the stair does not appear coordinated only because those layers are missing.
Compare straight, L-shaped and dog-leg options against the actual floor opening. A compact plan footprint can still introduce a headroom conflict under the upper floor. The fresh featured image is a concrete dog-leg study, so it illustrates the turn and landings without implying that timber stringers or steel connections are shown.
Use sections to find problems that a perspective hides
A section along the walking line is useful for reviewing the underside of the upper floor and the clearance above the stair. Another section across the landing helps explain its support and relationship to adjacent walls. Add simple reference volumes for door swings or furniture where they affect access. Keep the occupied walking zone visible.
If the top transition looks wrong, check the total rise and datum before changing individual treads. If a turning condition looks cramped, review the full landing or winder arrangement rather than narrowing the visual handrail. Save a copy before trying a new layout or material system. Each option should retain its own assumptions so the preferred appearance can be traced back to the inputs that produced it.
Document the stair as part of the building
Save a plan, walking-line section and perspective. Record total rise, actual count, measured riser and tread relationships, width and landing dimensions. Link the review to the floor opening and railing guide. State which material system is generated and which support details remain to be supplied. A stair study is most useful when its arrival points, opening and circulation are coordinated together.
A practical Lizark workflow
- Identify the lower and upper finished-floor references.
- Choose the supported stair layout and material system.
- Set width, total rise, tread and riser inputs.
- Place the stair and inspect the actual generated transitions.
- Check headroom, floor opening, landings and railing coordination.
What to check in the model
| Review | What to verify |
|---|---|
| Rise | Correct lower and upper floor references |
| Footprint | Full run, turn and landing dimensions |
| Section | Headroom and floor opening |
| System | Generated material and support arrangement |
Frequently asked questions
Should I use structural or finished floor elevations?
Use a consistent reference and account for floor finishes. Review the final stair-to-floor transitions in the model.
Does a stair preset verify building-code compliance?
No. Verify the actual dimensions and the locally applicable requirements as part of the project design.
Further reading
Product and industry references for the distinctions discussed in this guide:
